How To
How to Use Cricut Iron on Vinyl
If you’re new to the Cricut crafting world, you’re in for an exciting journey! In our comprehensive tutorial, we’ll guide you through the process of using Iron-on Cricut vinyl and explore the different types available. Iron-on vinyl is incredibly versatile and can be used on various items such as cotton bags, polyester, hats, t-shirts, and more.
Our step-by-step instructions will help you get started with Iron-on Cricut vinyl, from the basics of application to exploring the different types of vinyl to suit your specific projects. Whether you’re customizing apparel, creating personalized gifts, or experimenting with different crafting ideas, this tutorial will empower you to dive into the world of Cricut crafting with confidence.
Let’s embark on this Cricut journey together and uncover the endless possibilities of Iron-on vinyl. Get ready to create unique and impressive designs that will surely leave a lasting impression!

Step 1 – Prepare the Design then Cut the Cricut Iron-on Vinyl
In this step, we are quickly going to prepare the design. First, you need to upload your purchased SVG to Cricut Design Space. Once that is done, add the design to your canvas.

You may also need to change your machine if you are using more than one. On the homepage, click on the drop-down menu top right corner. Now, select the machine you want to use.

Attach and Resize the SVG
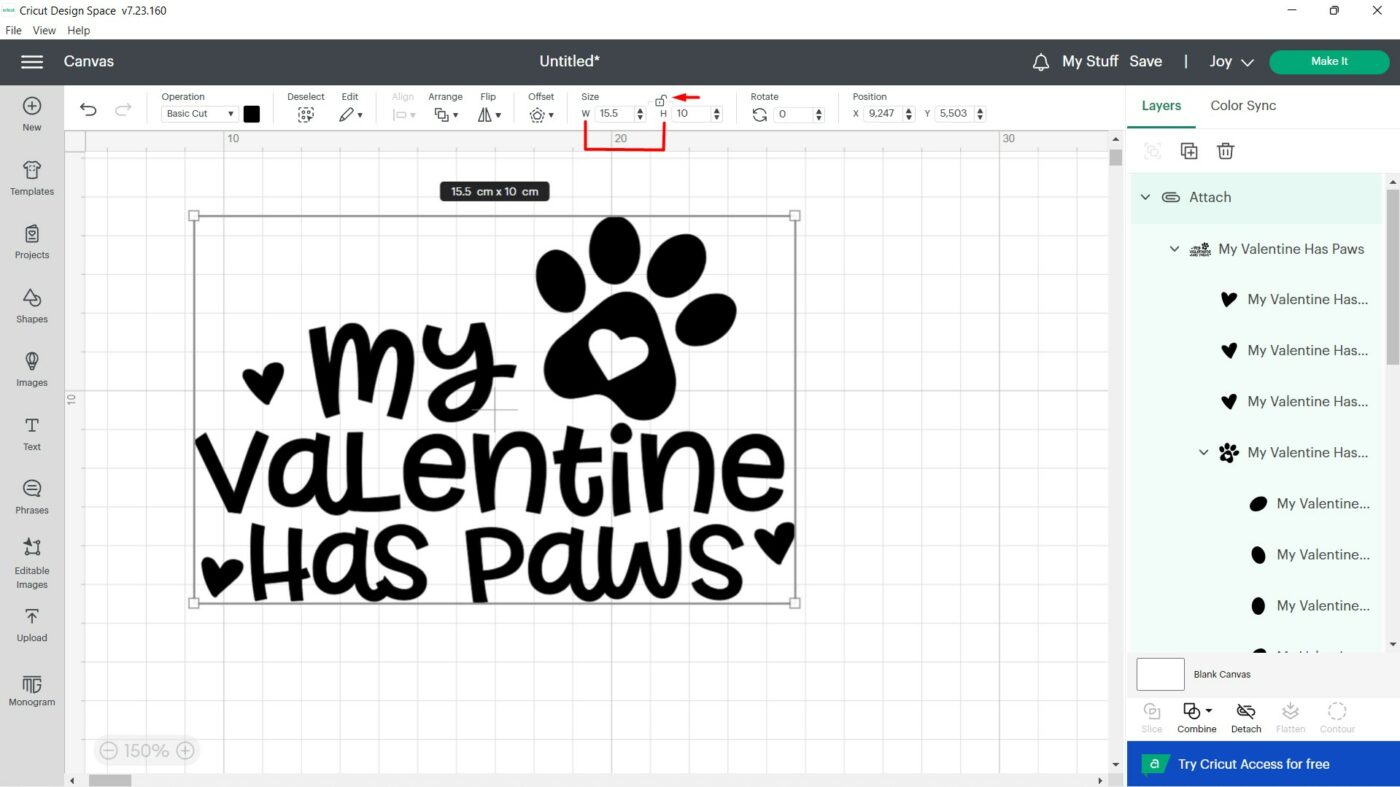
We will need to resize the design to fit our blank, which is a pencil case. Before resizing, it’s a good idea to attach all of the SVG elements to resize everything consistently. This will also tell Design Space to cut the SVG as it shows on the screen.
Cricut Design Space is intuitive in that it will rearrange the SVG elements to save material. In another project, this would be great, but we don’t want that to happen here. This is why we use the Attach option.
Select everything either by dragging a selection box around the design or clicking on the Select All button at the top of the screen.

Then, on the bottom right, click on Attach. You can still edit individual elements just by clicking on them under the Layers panel.

Next, at the top of the screen, make sure the Lock icon is unlocked. This will allow us to independently resize the width and height of the SVG. Check the size of your blank and type in the dimensions. Our SVG was sized to 15.5cm x 10cm (6.10” x 3.93”).

Cut the SVG Design with your Cricut Machine
We are now ready to cut the design. At the top right corner of the screen, click on Make it. On the next page, select your mat size and click on Confirm.

Important!! Mirror your SVG
This is one step you don’t want to miss. You cut with the shiny side or carrier side down but heat press with the shiny side up. You need to mirror or reverse your design for cutting, so that when you heat press, the design shows correctly.
It’s very easy to do and Design Space will always remind you. On the mat settings screen, under the mat (or mats, depending on your design), you will see a slider next to Mirror. Click on this slider to activate it so it shows as green.
Next, click Continue to go to the cut settings.

Select Cut Settings for Iron-on Vinyl
Cricut Design Space already has a pre-set cut setting for their Iron-on vinyl. On the cut settings page, click on Browse All Materials next to the first of three steps. Then, search for the iron-on vinyl that you are using. We selected the Iron-on setting and then clicked on Done bottom right corner.

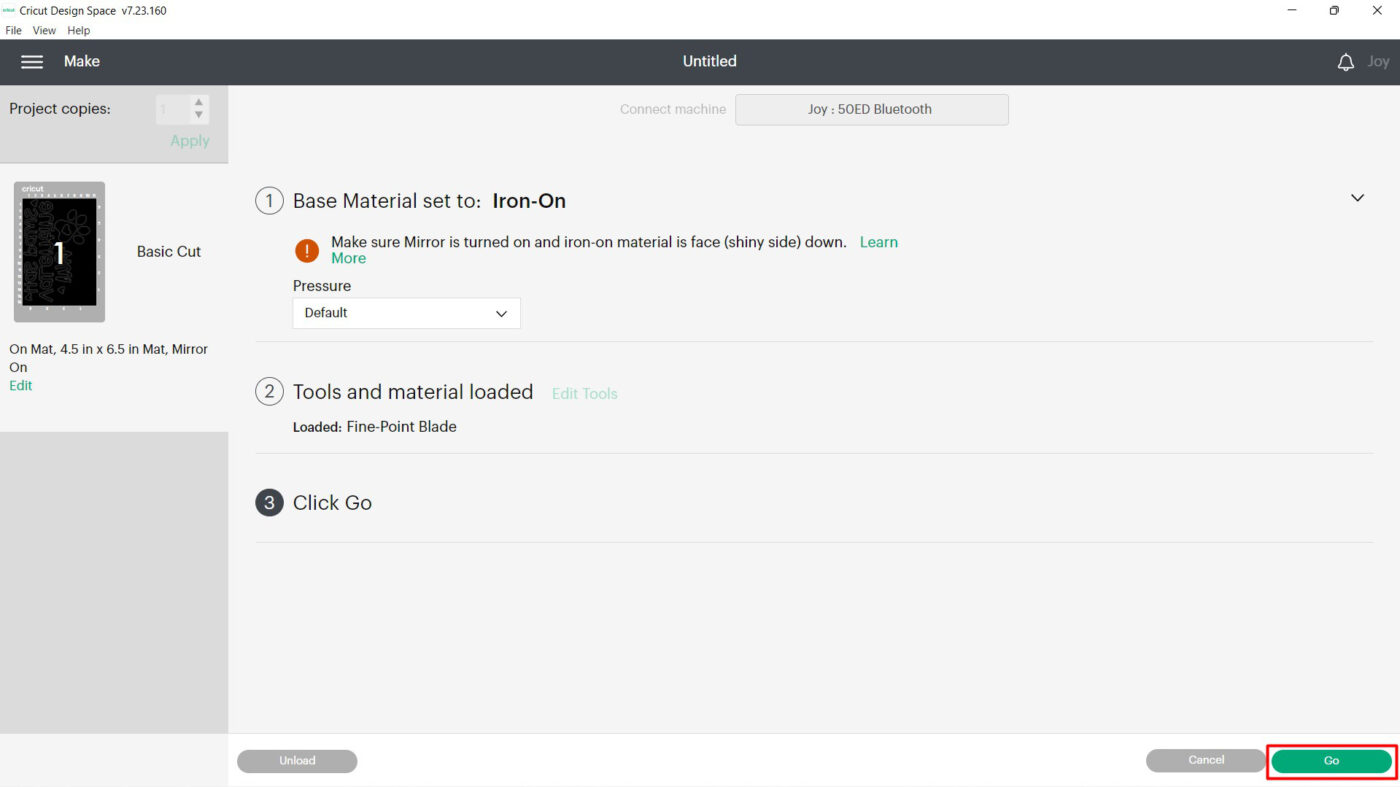
You can leave the pressure on Default or click on the drop down menu to select More. If the HTV doesn’t cut all the way through, you can cut again. More on that next, but first, follow the instructions.
Remember to load your mat, with the vinyl shiny side down and your Fine Point Blade. Here is a visual guide for loading your mat.

Cricut Design Space will detect the mat, material and blade before instructing you to click on Go bottom right of the screen.

Once the cutting is complete, don’t unload it yet. Use your weeding tool or a very thin craft knife to test an area to see if it lifts up. If the vinyl did not cut properly, or you’re not sure, there is an on screen option to click Rerun or Unload. Click on Rerun and let the machine cut using the same settings again.
Step 2 – Heat Press the Cricut Iron-on Vinyl SVG
After you have unloaded the mat, lay the mat face down and peel it back from the vinyl. Doing it this way will help to prevent the vinyl from curling.
Next, weed out or remove the excess vinyl.

Position on your blank and, if needed, use a heat pillow. Heat pillows protect the back of the blank if a zip or seam is present so an impression isn’t left behind. You can also use a folded towel placed inside your bag.

You can quickly find heat settings by going to the Cricut Heat Press Guide and choosing your heat press, vinyl and material. We used a normal heat press but selected the EasyPress 2, chose 100% cotton for our material and the Everyday Iron-on vinyl setting.
In order to apply the settings, we did need to select the Cricut Pressing Mat option.

You can then follow the heating and pressing instructions. If you don’t want to flip the bag or blank over, once the liner has been removed (allow it to cool first), place a piece of parchment over the design and press again.
You will know that the HTV has adhered properly if you can see the fibers through the vinyl. There you go, all done and ready for the next crafting adventure!

We hope that this tutorial has inspired the confidence to help you craft even more. Once you get past the starting point, it’s a world of imaginative fun and creation. This is only the beginning of what you can do with your Cricut cutting machine.

